Monny's Condo FAQ

Any doubt regarding the FAQ? Contact me on discord! "monsterwhore." Yes, the dot is part of it.
Carrd updated: March 31st, 2026. Hello! Apologies for the delay in updating this, since this guide is almost, to say the least, 'complete', minus some minor details regarding my wording. Important update is that The files now have Linux compatibility. So if you've got a friend who's on Linux and wants to join or host, now's their time. Yes, this does mean you've got to re-download the file or edit yours with the changes made.
I'd add a video view update, but all Analytics tell me is that it's over 5k.
Head back to the main hub here.
How do I host a local condo to avoid blacklists, bans and disconnects?
This tutorial goes over locally hosting a condo AND allowing players to join the local condo, a method that I must COMPLETELY credit to Nepnep. Nep's the one that's coded the means to make this method possible. I'm just the messenger.Now, why would you want to host a local condo?
The answer, simple as it is, is that you wouldn't want to go through Roblox servers. Usually because of these two reasons:
- Roblox servers can catch certain condo files ('blacklisted files') once you do a Team Test, and give you warning/bans.
- Roblox servers may employ AI Moderation that makes Team tests unreliable, forcing disconnects through Error Code 287 (If you've been having disconnects in team tests, this is likely the case for you).This method works by using the site Playit.gg, allowing you to create a 'tunnel' in which people can join you. Playit.gg doesn't show IP addresses of the people joining you, and instead shows the location of the nearest Playit.gg server. Furthermore, the way Playit functions means that your IP isn't exposed, it instead goes through a Playit cloud server (This goes both for the host and for the people joining). Playit is also an open-source software, which means you can just check the source code in case you're worried about it being malicious.This method requires a file depending on what device you're using.
If you're on Windows, you need to get the .bat file made by Nep, which you can get here or further into the steps.
If you're on MAC, you can instead get the .sh file here. The tutorials are done using Windows, but the process is similar - the main differences come when downloading Playit, where instead you'll have to compile it yourself.
Lastly, If you're on Linux, you will not be neglected and you can get a .sh file that works for Roblox Studio running on flatpak vinegar.If you're not the host, all you need to join into the server is the "Join Command" located in the .txt file generated, which the host must provide to you. You do NOT need Playit installed or anything other than Roblox Studio.You can either follow the video tutorial below, or follow the text tutorial.
1. Setting up the File
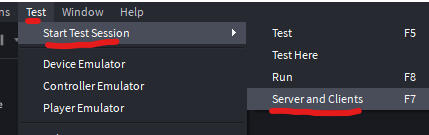
Open your condo file. From there, head to the upper tab.
Start a server with Test -> Start Test Session -> Server and Clients.
This will create a local server with your file, and store the file as 'cache'.You do NOT NEED to have the file saved or uploaded to Roblox.
You only need to do this step to store the file, you can close the server after it's fully loaded.
You have to do this step whenever you want to 'update' the server, or change the file.
2. Setting up Playit.gg
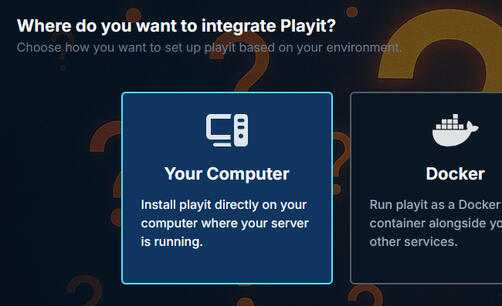
Head to Playit.gg and make an account if you don't have one, selecting that you want to use your computer to integrate Playit. You have to download the program itself as well.
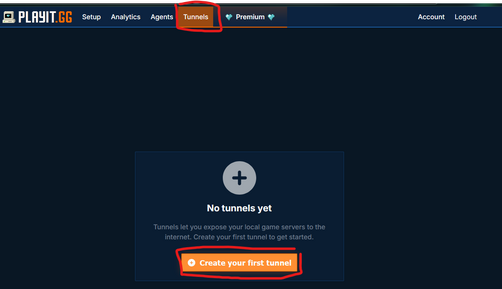
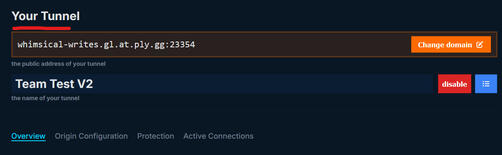
Once your account is made, you'll want to head to the Tunnels tab, and click on Create your first tunnel.
The name of the tunnel doesn't matter.
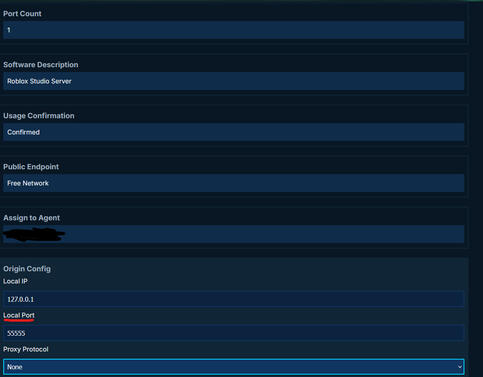
In Tunnel Type, you'll want to select UDP.

Most of the settings can remain as is.
The ONLY thing you need to do, is change Local Port to 55555.
If you have any doubts, look at the screenshot as to how the settings should look like.Once done, click Next then Create Tunnel.
Once the tunnel is created, it'll generate a public address.
You want to copy this address, and head to the next step.
3. Setting up the .bat/.sh file
If you use Windows, Download the .bat file in here if you haven't.
If you use MAC, get the .sh file here.
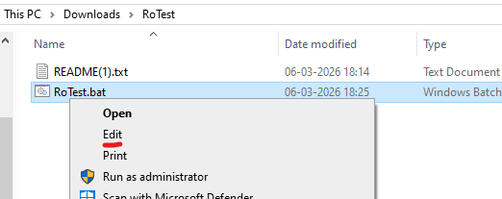
And if you use Linux, here's the file you need.Once you do, right-click it and Edit.
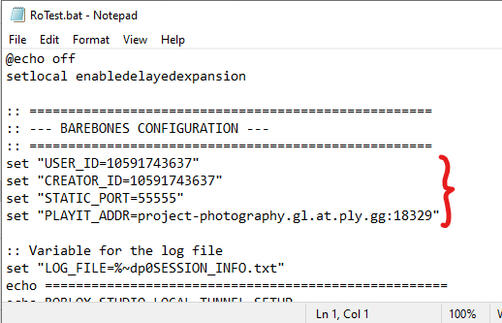
Head to the Barebones Configuration section of the .bat file.In there, change the PLAYIT_ADDR to the one you copied a couple of steps back.Next, change the USER_ID and CREATOR_ID to your Roblox player ID (the one that appears when you head to your profile). Keep STATIC_PORT as 55555.
Save and close the file.
Now, run the .bat file. This will do a few things.1 - Generate the server, opening up Roblox Studio in the process.
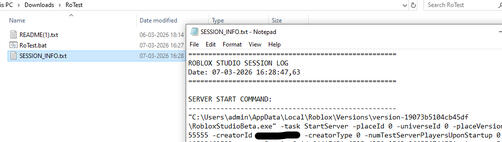
2 - Generate a .txt file named SESSION_INFO, which will include commands to start the server, and the command for someone to join.
3 - Copy the 'invite' command to your clipboard, allowing you to paste it for someone to join you, or to join yourself.
4. Joining the server
If you're the host, MAKE SURE you have both the Playit program and the Roblox Server opened. Otherwise you won't be able to join. You have to keep both of them open for the server to be up.
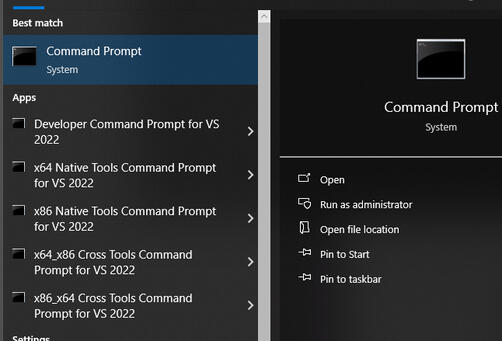
Running the .bat automatically opens the server, so in that case you only need to use the join command. To start the server up, there's a Server Startup command in the .txt file.If a Windows Firewall pop up appears, make sure to allow through the firewall.Open up the Command Prompt program in your PC, and paste the Join Command located in your SESSION_INFO.txt file.You'll know the command has worked if Studio opens up and loads you into the server as a player (Since it's just as a Client, you'll load as a default avatar named 'Player1', 'Player2', etc).For a person that isn't the host to join, all they need to do is join through the join command. They do NOT need to do this entire process or have anything downloaded other than Roblox Studio.
Troubleshooting / Questions
How do I join a hosted server?The host has a .txt file named SESSION_INFO. The host must give you the join command that corresponds to your device (Windows/Mac/Linux), and you must input this command into your device's terminal. NOT ROBLOX STUDIO'S TERMINAL.How do I update or change the file I want to use for my server?You have to open that new file on studio, and run a Server and Clients test. Doing so will replace the file that's used for the server next time you start it up.[------------------------------------------------------------------------------------]Getting error:SOCKET_PORT_PRIVILEGED when trying to start the serverThis issue occurs when the port is occupied or unavailable. Such as when:
- The server is already open. In this case, close all the studio tabs you've got open, and run the Start Server command before trying to join again.
- Another scenario is that there's already a service occupying the port. In this case, you can check what process is by executing the following command in CMD prompt:netstat -aon | findstr :55555This will show the port and what process is occupying it, in the form of the PID. After that, you can check in Task Manager -> Details for the process matching the PID. Closing this process should solve the issue.If this doesn't solve your issue, try restarting your PC and starting the server.Stuck on "Loading Data Model" when joining the serverThis issue is usually due to human error, and refers to the fact that you're trying to connect, but the connection isn't being made.
- Make sure that both the server is open, and you have the Playit program on.
- In the playit program, make sure that the output address is 127.0.0.1:55555. Take SPECIAL note of the amount of 5's in the port.
- Double-check that the .bat was changed properly. As an example, the configuration for the address in the .bat should look like:set "PLAYIT_ADDR=yourtunneladdresshere"- This issue also occurs if you're using a DPI spoofer (AKA, if Roblox is banned in your country). In which case, you should still be able to do this method as long as you use a VPN. I've gotten reports of it functioning using WARP and Kaspersky VPN.- This issue can also occur in very rare edge cases, with a person's computer simply taking a very long time to connect. The most likely scenario, in this case, is that your ISP is unable to recognize the IP from Playit. Thankfully, this isn't an unknown issue for Playit, and thus they have developed a guide to update your DNS server, and therefore clear this issue. Make sure to follow each step, and then retry joining the server.Cannot open place file for reading.: iostream stream errorThis occurs when there's no file cached in your computer. Open up your condo file and do a Server/Clients Test, and wait for it to fully load so it caches properly. This should solve the issue."Access Denied" shows in the CMD prompt when running the .bat fileThis means that the .bat file is being restricted in some form - usually due to an antivirus, or because your account doesn't have admin permissions. Check if your antivirus blocked the .bat file, or if you don't have enough permissions to run it in its entirety."Cannot validate argument on parameter 'Filepath'. The argument is null or empty." shows in the CMD prompt when trying to use the join commandThis error occurs when the studio .exe is unreachable or doesn't exist. This can occur due to the .exe simply not existing in the folder (more common) or due to environment variables being undefined (very rare).For the first case, run the following command in powershell:Get-ChildItem "$env:LOCALAPPDATA\Roblox\Versions" -Recurse -Filter RobloxStudioBeta.exeIn an ideal scenario, this should output the directory and the .exe. If there is no output (i.e, you do the command and nothing happens) Then chances are likely, there is no .exe due to an incomplete/corrupt installation of Studio. In this case, reinstall studio and re-run the command to confirm the existence of the .exe.If you suspect that this issue might be related to your system variables, run the following command in CMD prompt:echo %localappdata%This should output the directory C:\Users\Username\Appdata\Local. If it outputs something different (For example, if the output is literally the string "%localappdata%"), then it's likely that the variable %localappdata% isn't defined correctly in your system. Which is kind of concerning... but at least you know the reason now, and a simple tutorial/google search should help you out.